Hello Friends,


Sensor Setup - 2





After a long delay, now again I am ready to post some
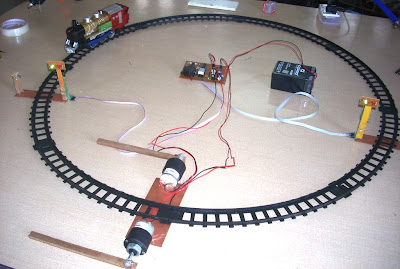
interesting projects. Here I am sharing automatic Railway Gate control system
using AVR micro controller. Gates will close automatically when train arrival
and open when train departure from crossing. The main purpose of this project is to avoid
accidents and save time.
This project utilizes Two IR Tx./Rx. Pair is placed at either
side of the gate with some distance as shown in the pic above. When train cuts first sensor light
signal toggled from Green to Red; a buzzer gets activated for 2 seconds and
railway gate will closed. When train cuts second sensor then a countdown timer
starts and when it counts zero light signal again toggled from Red to Green ;
again buzzer gets activated for 2 Seconds and gates will closed. Timing for
countdown timer is set in the controller according to the speed and length of
the train. You can easily measure this timing for your toy train. I made this
bidirectional so train’s direction doesn’t matter.
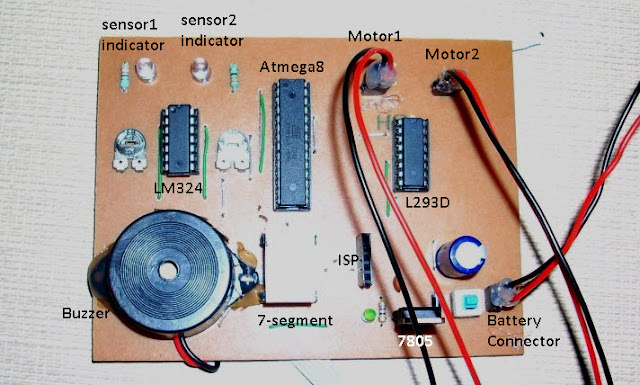
I design circuit using AVR ATmega8 microcontroller.IR sensors output is connected to comparator LM324.LM324 generates TTL High/Low signal at its output pins which is fed to MCU's pins as Input. According to input from LM324 Micro-controller take action. Two DC Motors is used for controlling the gate, these motor's current requirement is much more then MCU hence we need a Motor Driver IC L293D.
Required Components:
1.DC Geared Motors RPM:30 - 2
2.IR Tx./Rx. Pairs - 2
3.MCU ATmega8 - 1
4.IC-LM324 - 1
5.IC-L293D - 1
6. Registers 470E - 10,10K-2,4.7K-1
7.Capacitors : 1000uF.16volt -1 , 100nF-1
8.Seven Segment CC - 1
9.Some LED's : 2- Green, 2-Red, 3 others
10.7805 -1
11.6Volt,4.5MAh Battery
12.some wires, burg strips etc.
and a Toy Train --
Circuit Diagram:
Making:
step 1 : First make the sensor setup.IR Tx./Rx. should be connected in line of sight. Two signal LEDs. Total five wire comes out from this sensor setup- VCC, GND, Sensor Output, Red LED anode, Green LED anode. Distance between IR Tx./Rx. is about 12cm.
Sensor Setup - 1
Sensor Setup - 2
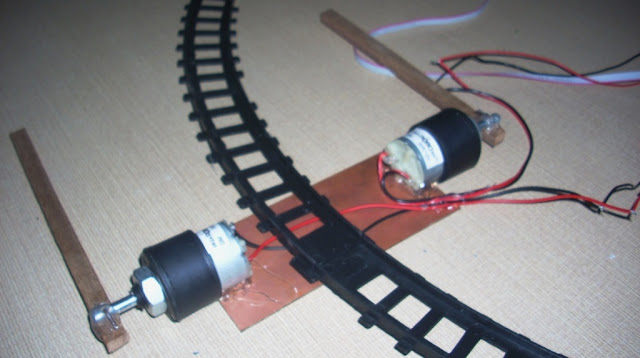
Step:2 Gear Motor's setup.
Step:3 Circuit design. I design the layout in PCB-Wizard.
Step:4 Whole setup -
See Video for more clarification.
Software : source code is written in C. MCU - Atmega8 @1MHz internal.Compiler - WINAVR.
#define F_CPU 1000000UL
#include <avr/io.h>
#include <util/delay.h>
#define CUT1 bit_is_clear(PIND,0)
#define CUT2 bit_is_clear(PIND,1)
#define BEEP PORTD|=(1<<PD4);\
delayms(1500);\
PORTD &=~(1<<PD4);\
#define MOTOR_CW PORTC = 0B00111010;\
delayms(800);\
PORTC=0X00;\
#define MOTOR_ACW PORTC = 0B00110101;\
delayms(800);\
PORTC=0X00;\
#define RED_ON PORTD|=(1<<PD6);\
PORTD&=~(1<<PD7);
#define GREEN_ON PORTD|=(1<<PD7);\
PORTD&=~(1<<PD6);
char seg[10]={0x3F,0x06,0x5B,0x4F,0x66,0x6D,0x7D,0x07,0x7F,0x6F};
void delayms(uint16_t ms){
while(ms){
_delay_ms(1);
ms--;
}
}
int main()
{
DDRC = 0xFF;//All Outputs
DDRB = 0xFF;//All Outputs
DDRD = 0XF0;//PD0,PD1 Inputs,PD4-PD7 Outputs
PORTD|=(1<<PD0)|(1<<PD1);//Internal Pull Ups
int i,done;
while(1){
done=0;
GREEN_ON;
PORTB=0X00;//Segment OFF
if(CUT1){
BEEP;
while(CUT1);
while(!CUT2){RED_ON;if(!done){MOTOR_CW;done=1;}}
if(CUT2){for(i=9;i>=0;i--){PORTB=seg[i];delayms(700);}
#include <avr/io.h>
#include <util/delay.h>
#define CUT1 bit_is_clear(PIND,0)
#define CUT2 bit_is_clear(PIND,1)
#define BEEP PORTD|=(1<<PD4);\
delayms(1500);\
PORTD &=~(1<<PD4);\
#define MOTOR_CW PORTC = 0B00111010;\
delayms(800);\
PORTC=0X00;\
#define MOTOR_ACW PORTC = 0B00110101;\
delayms(800);\
PORTC=0X00;\
#define RED_ON PORTD|=(1<<PD6);\
PORTD&=~(1<<PD7);
#define GREEN_ON PORTD|=(1<<PD7);\
PORTD&=~(1<<PD6);
char seg[10]={0x3F,0x06,0x5B,0x4F,0x66,0x6D,0x7D,0x07,0x7F,0x6F};
void delayms(uint16_t ms){
while(ms){
_delay_ms(1);
ms--;
}
}
int main()
{
DDRC = 0xFF;//All Outputs
DDRB = 0xFF;//All Outputs
DDRD = 0XF0;//PD0,PD1 Inputs,PD4-PD7 Outputs
PORTD|=(1<<PD0)|(1<<PD1);//Internal Pull Ups
int i,done;
while(1){
done=0;
GREEN_ON;
PORTB=0X00;//Segment OFF
if(CUT1){
BEEP;
while(CUT1);
while(!CUT2){RED_ON;if(!done){MOTOR_CW;done=1;}}
if(CUT2){for(i=9;i>=0;i--){PORTB=seg[i];delayms(700);}
BEEP;GREEN_ON;MOTOR_ACW;
}
}
if(CUT2){
BEEP;
while(CUT2);
while(!CUT1){RED_ON;if(!done){MOTOR_CW;done=1;}}
if(CUT1){for(i=9;i>=0;i--){PORTB=seg[i];delayms(700);}
}
if(CUT2){
BEEP;
while(CUT2);
while(!CUT1){RED_ON;if(!done){MOTOR_CW;done=1;}}
if(CUT1){for(i=9;i>=0;i--){PORTB=seg[i];delayms(700);}
BEEP;GREEN_ON;MOTOR_ACW;}
}
}
return 0;
}
}
return 0;
}
After making this project I realize some limitation, first it required
different type of IR sensors which should not detect human interrupt and second
thing is at gate closing time if any vehicle present in between and below the
gate then gate should detect the presence of any vehicle or obstacle. If you
resolve these then please share.
Downloads:complete code + hex file
Video:
~Pratyush


 step:4


